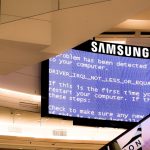
When your Dell computer gets stuck on the Pre-Boot Performance Check screen, it can feel like your device is frozen in limbo. You power it on expecting productivity, but instead you’re met with diagnostic messages, endless loading, or a system that refuses to move forward. The good news? This issue is usually fixable without professional repair. With the right troubleshooting steps, you can get your Dell back up and running quickly and safely.
TL;DR: If your Dell is stuck on the Pre-Boot Performance Check, start with a simple restart and external device disconnect. Run Dell’s built-in diagnostics and check your BIOS settings. If necessary, repair corrupted system files or test your hard drive and RAM for hardware failure. In most cases, the issue is caused by boot order errors, drive faults, or interrupted updates.
What Is the Dell Pre-Boot Performance Check?
The Pre-Boot Performance Check is a diagnostic feature built into Dell computers. It runs before the operating system loads to test critical hardware components such as:
- Hard drive or SSD
- RAM (memory)
- Processor
- Cooling fans
- Battery and power adapter
This tool—often referred to as Dell ePSA (Enhanced Pre-Boot System Assessment)—is designed to detect hardware problems early. Normally, it runs quickly and then proceeds to boot Windows. But if the system gets stuck, it usually indicates either a hardware fault or a boot configuration issue.
Why Your Dell Is Stuck on Pre-Boot Performance Check
Several underlying issues can cause the system to freeze at this stage. Understanding them helps you apply the right fix.
1. Corrupted System Files
If Windows system files are damaged due to improper shutdowns or malware, the boot process may fail and trigger repeated diagnostic checks.
2. Failing Hard Drive or SSD
A deteriorating storage drive is one of the most common causes. Bad sectors or read failures prevent the OS from loading.
3. Loose or Faulty RAM
If memory modules are not properly seated or have errors, the system can halt during pre-boot testing.
4. Incorrect BIOS Settings
Boot order changes, switching from UEFI to Legacy mode, or misconfigured SATA settings may confuse the system.
5. Peripheral Conflicts
External drives, USB devices, or printers connected during startup may interfere with the boot process.
Step-by-Step Fixes for Dell Stuck on Pre-Boot Performance Check
Step 1: Perform a Hard Reset
This is the fastest and simplest solution and often resolves temporary glitches.
- Turn off your computer.
- Unplug the power cable.
- Remove the battery (if removable).
- Press and hold the power button for 15–20 seconds.
- Reconnect everything and power it back on.
This clears residual electrical charge and resets minor hardware hiccups.
Step 2: Disconnect External Devices
Remove all external peripherals, including:
- USB flash drives
- External hard drives
- Printers
- Docking stations
- SD cards
Restart your computer with only the keyboard and mouse connected. If it boots normally, one of your peripherals was causing the issue.
Step 3: Run Dell Built-in Diagnostics Properly
Sometimes the system freezes because diagnostics were interrupted. To manually run a clean test:
- Power off your device.
- Turn it on and repeatedly press F12.
- Select Diagnostics from the boot menu.
- Allow the test to complete fully.
If you see an error code, write it down. Dell error codes (like 2000-0142) can pinpoint failing hardware.
Image not found in postmetaStep 4: Check and Correct BIOS Settings
Incorrect BIOS configurations often cause boot loops.
- Restart your computer.
- Press F2 during startup to enter BIOS.
- Verify the Boot Sequence.
- Ensure your primary drive is first in the order.
- Confirm boot mode is set correctly (usually UEFI).
If unsure, choose Load Default Settings, save, and exit.
Step 5: Inspect Hard Drive Health
If diagnostics indicate drive issues, test further using built-in Windows tools (if accessible) or external tools.
If you can boot into Safe Mode:
chkdsk C: /f /r
This scans and repairs disk errors. If the drive repeatedly fails, replacement may be necessary.
Step 6: Reseat or Test RAM
For desktop users (or technically comfortable laptop users):
- Turn off and unplug the system.
- Open the case.
- Carefully remove RAM sticks.
- Reinsert them securely.
If problems persist, test one module at a time to identify a faulty stick.
Image not found in postmetaStep 7: Repair Windows Startup
If hardware checks pass but Windows still won’t load:
- Create a Windows installation USB.
- Boot from the USB.
- Select Repair your computer.
- Choose Startup Repair.
This process repairs corrupted boot files without deleting your data.
Comparison of Diagnostic and Repair Tools
| Tool | Purpose | Built-In or External | Ease of Use | Best For |
|---|---|---|---|---|
| Dell ePSA Diagnostics | Hardware testing | Built-In | Very Easy | Quick hardware checks |
| Windows Startup Repair | Fix boot files | Built-In | Easy | OS corruption |
| CHKDSK | Disk error scanning | Built-In | Moderate | Bad sectors |
| MemTest86 | Advanced memory test | External | Moderate | RAM diagnostics |
| CrystalDiskInfo | Drive health monitoring | External | Easy | SSD or HDD health check |
When the Problem Means Hardware Failure
Sometimes the pre-boot performance check is doing exactly what it’s designed to do—detecting serious hardware damage.
Warning signs of failing hardware include:
- Clicking or grinding noises from the drive
- Repeated error codes
- Slow system performance before failure
- Overheating problems
If your hard drive is failing, back up data immediately using:
- An external USB enclosure
- Another computer
- Data recovery software
Then consider replacing the drive with an SSD, which improves both reliability and speed.
How to Prevent This Issue in the Future
Prevention is simpler than repair. Here’s how to reduce the chances of getting stuck again:
- Keep your BIOS updated through Dell SupportAssist.
- Avoid forced shutdowns unless absolutely necessary.
- Run disk checks periodically.
- Monitor drive health using SMART tools.
- Back up your data regularly.
- Keep your system free from malware.
Routine maintenance dramatically lowers the likelihood of startup failures.
When to Contact Dell Support
If you encounter persistent diagnostic error codes or the problem continues after trying all the steps above, it may be time to contact Dell Support. Be ready to provide:
- Your service tag
- Exact diagnostic error codes
- A description of symptoms
If your device is under warranty, hardware replacement may be covered.
Final Thoughts
A Dell computer stuck on the Pre-Boot Performance Check can look intimidating—especially when you’re unsure whether the issue is temporary or serious. Fortunately, most cases boil down to a manageable cause: incorrect boot settings, a glitchy update, failing storage, or loose memory.
By following a structured troubleshooting approach—starting with simple resets and moving toward hardware checks—you can diagnose and fix the issue without panic. And even if the problem turns out to be hardware failure, the pre-boot diagnostic is doing its job by catching it before data loss becomes catastrophic.
Stay calm, work methodically, and your Dell will likely be back to full performance sooner than you expect.